Wednesday, January 30, 2013

DIY // Pipe Table


My husband and I recently made our own exposed closet out of galvanized pipes, planks of wood and pieces from IKEA’s Stolmen collection. After we had built our closet and were incredibly pleased we brainstormed other projects that would utilize pipes such as bookshelves and tables.

The oddly shaped nook we currently use as a makeshift office desperately needed a new desk we looked and looked everywhere, but no one made a desk even close to the proper size. Then we remembered the idea we had several months ago. After taking all the proper measurements we were off to the hardware store to buy some pipe.

Here’s what we got:


Fittings
6 // Flanges
6 // Threaded Tees
4 // Caps

Pipes
6 // 1/2 x 12"
1 // 1/2 x 30"
4 // 1/2 x 18"
2 // 1/2 x  5"
Tips:
Start building the table left to right. Because of the direction the pipes are threaded you cannot build the legs separably. 
   
Wait to place the cap on until the last and adjust them to the proper height to make your table level. 


Here is what we used for the table top:

Sunday, January 20, 2013

DIY // Stamps


Since I have started crafting I have been constantly hunting for items like stamps at retail stores but this has become costly and time consuming. So I started looking for a better way to make the stamps for each project. Here is a fun and quick way to make your own stamps to fit any and every project. 


Thursday, January 17, 2013

DIY // Bath Salts


 [1] Epsom Salt [2] Coarse Sea Salt [3] Glass or Plastic Jar [4] Baking Soda [5] Essential Oil

Bath Salts are sold just about everywhere but, did you know they are incredibly easy to make and super cheap? You can also use any kind of essential oils creating your own personal fragrance.

Bath Salts make a perfect gift and look fantastic in a beautiful mason jar. With Valentine’s Day right around the corner it’s a fun handmade gift. 


 [Done] Place in any glass jar that seals tightly and label. 


Tuesday, January 15, 2013

DIY // Tripod Lamp

Supplies
{1} Antique Tripod {2} Bulb {3} Lamp Shade {4} Extension Cord {5} Light Fixture {6} Pipe Adapter

Tools Needed
 Phillips Head Screwdriver + Wire Stripper


Wednesday, January 9, 2013

WISHLIST // a backpack for biking


When I bike, I’m either going to work, to the store or out with friends, and I need a backpack that can do all those things seamlessly. With my current backpack it’s tricky for me to get my u-lock and I stubble at the register getting groceries to fit. So, I’m on the hunt for a new backpack, something stylish as well as durable and supportive.

The main thing I need is a pocket that fits my U-lock so; I can keep it separate for other things in my back and for it to be easily accessible.


Sunday, January 6, 2013

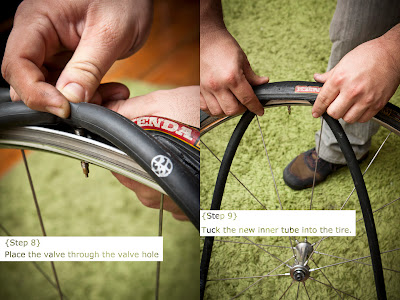
Flat Tire Fix


Nothing is more deflating to ones' spirit than a flat tire. They can be fairly costly to replace anywhere from 15.00-22.00. So here is a step by step DIY that cost much less.


 {1} Your flat tire {2} Air pump {3} New inner tube {4} Tire levers


Thursday, January 3, 2013

DIY Cake Toppers


[1] Brush [2] Pencil [3] Wooden Figures [4] Acrylic Paints 

[Step 1] Pencil out your design on the wooden figures. Keep in mind the wood acts as the skin tone, so leave space for arms, feet, and neck.

[Step 2] Paint in large sections first; allow to dry before moving on so you don't smudge your beautiful figure.

[Step 3] Paint in all the detail. I didn't have much detail on the bride figure but the groom had several: a belt buckle, sleeves, pant legs, and of course his favorite hat. 

Our Finished Cake Toppers

Wednesday, January 2, 2013

Meet Tulle & Wrench


With the New Year we wanted to start a long time goal of creating a blog about things we love.

We love working with our hands and creating new things sometimes out of old things, sometimes out of new things, and sometimes just improve the things we have.   

Hope you join us on our new adventure. 

-Tulle & Wrench