Showing posts with label tulle and wrench. Show all posts

Tuesday, February 4, 2014

Minimalist Challenge // DAY 4

We're 4 days into the minimalist challenge and I can’t see a visual change. I can see why a lot people quit during the second week of this challenge. It's hard and, I'm not a materialistic person. I hate clutter and stuff. HATE IT. It's hard because it requires a lot of time, time to sort out the things that are important from the things that aren't. You have to organize the junk drawer that hides all those random odd and ends. Further into the month, it will only take more time. The project becomes daunting.

But, with every item I throw away I feel a sense of accomplishment. Change is around the corner a new chapter in my life is beginning. A cleaner, calmer and more productive life is closer than it was three days ago. That feels fantastic and enough to keep me going.  


His
 Two t-shirts // Cordless Drill // Power Cord
Hers
Pair of Shoes // Bottle // Two Packs of Paper 


Saturday, February 1, 2014

The Minimalist Challenge


Constantly trying to improve my apartment with D.I.Y projects and crafting has created a home full of unfinished or unsuccessful projects. Having a husband who loves to collect and fix up bikes has only complicated things. We have created a clutter monster that has endless piles of food.  So, for the month of February my husband and I will attempt The Minimalist Challenge. For those who haven’t heard, The Minimalist Challenge is a project geared towards reducing clutter and taking an inventory of personal possessions. Much like the 100 Things Challenge. 

Each day of the month each participant will give up that many items. So, on the first day each person will give away one item. On the second, two items. So on, and so on until the last day of the month. The 28th. The items MUST be gone by midnight each night, they can be donated, sold, or thrown away.

In total: 812 items 

Through this project I hope to define what is needed, what is wanted, and what is completely unnecessary. We will have a clean house and a house free of distraction where we can focus on what we want to do and not what we have to clean up. 

Each day I will post our donated item and document the project. 

Day 1 
 

Today we finally donated a box full of old clothes, shoes and silverware that has been sitting in our apartment for weeks and a t-shirt that my husband has a duplicate of. 


New Year, New Goals


As 2013 begins to fall away and a shiny 2014 surrounds us everyone begins to look at the future and make resolutions. Resolutions about a toned body, a cleaner more organized apartment, a smarter mind, and an all around better life. I find myself falling into this same pattern. I’m evaluating my life and only seeing the negative things. And that is terrible. I have so many things to be thankful of and I truly have a wonderful life. I like my job, I have a magnificent and loving husband, and a fantastic cuddle bug of a dog. It’s true there are things in life I would like to accomplish and changes I would like to make, so instead of listing a series of resolutions I have decided to make a list of goals. Hopefully, through focusing on completing my list of goals I will succeed at changing my behavior. 

Goals of 2014
  • Start an Etsy
  • Sell an item on Etsy
  • Sell items at a craft fair
  • Keep up Tulle&Wrench
  • Compete in a bike race
  • Minimize the clutter in my apartment


Friday, June 28, 2013

DIY// Where We've Been


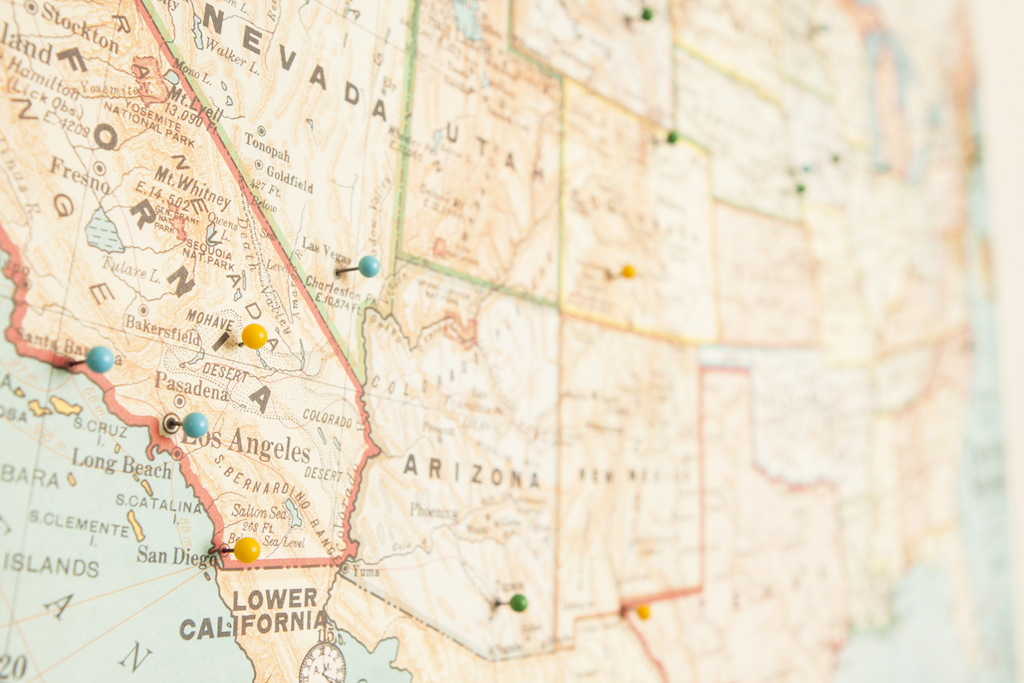
We've been looking for a "Where You've Been" map for a while. Looking in every store possible for the perfect map in a color scheme that matched our apartment and lives. We were looking for a United States map specifically as we wanted the map to be fairly detailed.  Finally, we found a map at Paper Source.

We wanted to create an interactive piece of art that told a story about of travels as individuals and as a couple. It turned out to be a wonderful conversation piece because it allowed our friends to ask us about our travels around the nation as well as tell us stories about their travels. 


1 //  Map
2 // Spray Adhesive
3 // A Roller
4 // Map Tacks


Spray the adhesive on a foam core board or piece of cardboard. You will want to do this outside or lay down plastic as it will be very sticky and impossible to remove from surfaces.

Also, make sure the foam core is exactly the size of your artwork. If  not, you will need to cut it down to size on your own or you can ask an employee at your local craft store; most art and crafts store will cut them for a small fee. 


Line up two corners of map at one end of the foam core and gently place down. Using the roller, gently press the rest of the paper onto the foam core.
Once the map is down you can then use the roller to press out any remaining air pockets. You may need a partner in crime for this step. 


// If you do not own a roller you can use a rolling pin. //


Have fun placing your map tacks where you've been or where you someday what to go. 


We divided our colors into three categories:
Yellow // His
Green // Hers
Blue // Ours'


Wednesday, February 27, 2013

Two Tickets to California


We recently visited family in California.  Along the way we found some great spots to eat, shop, and hangout. 


[Handsome Coffee Roasters]  
Handsome coffee roasters is a fairly new shop celebrating their first anniversary on Friday still they have gotten a lot of attention. The menu is simple, just four items, but don't let that intimidate you the drinks are exceptional. 

Located in Los Angeles Arts District, Handsome is an open and inviting shop with long wooden tables and simplistic metal stools.  

[French Press]
French Press is a fantastic coffee shop in Santa Barbara, CA. Since our last visit they have only grown. 


[The Refill Shoppe]

The Refill Shoppe is a place where you can refill bottles with shampoo, conditioner, and various soaps all of which are made locally. Once you have filled your bottle you can also create a custom scent.
The colorful wool balls are dryer balls that replace dryer sheets. They reduce static and make clothes fluffy but never need to be replaced and you can add any essential oils to them.


[The Vinyl Warehouse]
We got a record player for Christmas and have been searching for vinyl to add to our very small collection. Our friends told us about a warehouse that was converted into a record store and said it was full of cheap vinyl, almost everything is 3 dollars or 2 for 5! 


[The Ventura Pier] 
A wonderful place to take in the ocean and not a crowded as the Santa Barbara Pier. Also, it was made famous by Little Miss Sunshine.


Sunday, February 24, 2013

DIY // Cake Stand


When Ace and I were deciding on things for our wedding one of the first decisions we made was to have cupcakes instead of a traditional cake. Not only where they cheaper but we could pick more than one flavor. NO brainier, right? Then, we were on the hunt for cake stands of all different size and in colors that matched our wedding. I realized quickly that we did not have the money in our wedding budget to buy several cake stands.  I found an easy and affordable solution; I’ll make my own with some thrift store plates and candlesticks. Several trips to the thrift store and an afternoon of gluing we had five cake stands.  


[Supplies]
Plate, Gorilla Glue, and candlestick


[Step 1] Add glue where candlestick and plate make contact.


[Step 2] Place weight evenly on candlestick for 1-2 hours.


Friday, February 15, 2013

Scrapbook // Wedding

Creating a wedding scrapbook is a intimating task, the pressure to make something that will be passed down from generation to generation is daunting. You want it to be beautiful and capture that perfect special day. After a year, we couldn't put it off any longer. To the craft store we went.  

The scrapbook we had in mind was clean and simple with a burst of color so, we bought colored tape and a box of cute cardboard cutouts and printed paper.

This is our scrapbook:


Wednesday, February 13, 2013

DIY // Valentine's Day Box


Thanksgiving is a time when we are all thankful of the wonderful things life has granted us; family, friends, delicious meals, a roof over our heads. But, we often forget about the smaller everyday things that make us smile and brighten up our day.  This Valentine’s Day project is all about highlighting those smaller moments.

This project is for everyone, roommates, families, co-workers.

Every time someone dose something special or nice or you think this person is wonderful because…write it down, fold it up and put into the Valentine’s Day box. After a week or a couple days of everyone having written messages open the box and pass it around the table having everyone taking a turn to read a message out loud.  


Supplies


[Step 1]
Wrap the box just like you would wrap a present.


[Step 2]
Cut a hole through the top of the box.


[Step 3]
Decorate, with your own handmade stamps!


[Step 4]
Cut up some paper and start leaving notes.


Monday, February 4, 2013

Things We Carry // Wrench


Working at a bike shop I constantly get the question: What do you keep in your bag?
All of these items fit neatly into the front two pockets of my large Bailey Works Bag

{1} Bailey Works Bag
Its important to have a bag that fits comfortably and meets your needs. My Bailey Works Bag, which has a large compartment and some smaller internal and external pockets meets my needs.
{I will be doing a more in depth review of the bag later.}


{2} U-Lock
Nothing special here. The U-lock from Kryponite remains to be the standard. Its thick steel that keeps most hand held cutting tools at bay.


{3} Multi-Tool
A multi tool can be a great way to save some weight and space in your bag. This tool by Serfas contains a set of allen keys, a chain break tool, and some basic wrench sizes.


{4} Frame Pump
This will NOT get you enough pressure for a permanent fix. This will only get you home or to the nearest bike shop. An alternative would be using CO2 cartridges but these can only be used once and at 4-7 dollars each it can get pricey in the long run.


{5} Batteries
My lights use AAA batteries so I like to keep a set on me in case my lights go out.


{6} Tire Levers
Used to change a flat tire.

{7} Adjustable wrench
If you have bolt on wheels you will need this to get your wheel off. Typically, axel nuts are 15mm but I like the adjustable wrench, because I can use the wrench for other parts of my bike.

{8} Spare Inner Tube
A spare inner tube can mean the difference between running 15 minutes late or running and hour late. I prefer this to a patch kit because its faster and more secure than gluing a patch on an inner tube.

{9} Gloves
Nothing makes my commute feel longer than numb fingers. I just keep a pair of light weight gloves just in case the weather gets a bit nippy.


{10} Pen & Pad
You always seem to need a pen and paper when you don't have one, so I keep it handy.

Other things to consider: A thin light weight rain jacket and pants, Food (cliff bar or power bar), a water bottle, bungee cords

What do you keep in your bag? 

Saturday, February 2, 2013

DIY // Vinyl Coasters

Excited about our new record player, we decided to run out a purchase a stack or records at our local record store. Some of the purchases we made out of the dollar bin and we were stuck with some records that were unplayable. So, we decided to make some coasters out of them.

{Supplies}
A Vinyl record that has seen better days and a tin can (choose a can that has the diameter that you desire)

{Tools}
Can opener, wooden spoon, a pair of oven mitts, and a bit of sand paper


{Step 1}
Use the can opener to cut the top and bottom of your can.


{Step 2}
Heat the can on the stove


{Step 3}
Grab your oven mitts and press the hot side of your can into the record. Sometimes the vinyl will stick to the inside of the can use a wooden spoon to poke them out. 

{Step 4}
Some of the edge may be a bit rough so go over them with a bit of medium grit sand paper


Each record will wield about 4-6 coasters depending on the size of your tin can.


Wednesday, January 30, 2013

DIY // Pipe Table


My husband and I recently made our own exposed closet out of galvanized pipes, planks of wood and pieces from IKEA’s Stolmen collection. After we had built our closet and were incredibly pleased we brainstormed other projects that would utilize pipes such as bookshelves and tables.

The oddly shaped nook we currently use as a makeshift office desperately needed a new desk we looked and looked everywhere, but no one made a desk even close to the proper size. Then we remembered the idea we had several months ago. After taking all the proper measurements we were off to the hardware store to buy some pipe.

Here’s what we got:


Fittings
6 // Flanges
6 // Threaded Tees
4 // Caps

Pipes
6 // 1/2 x 12"
1 // 1/2 x 30"
4 // 1/2 x 18"
2 // 1/2 x  5"
Tips:
Start building the table left to right. Because of the direction the pipes are threaded you cannot build the legs separably. 
   
Wait to place the cap on until the last and adjust them to the proper height to make your table level. 


Here is what we used for the table top:

Sunday, January 20, 2013

DIY // Stamps


Since I have started crafting I have been constantly hunting for items like stamps at retail stores but this has become costly and time consuming. So I started looking for a better way to make the stamps for each project. Here is a fun and quick way to make your own stamps to fit any and every project. 


Thursday, January 3, 2013

DIY Cake Toppers


[1] Brush [2] Pencil [3] Wooden Figures [4] Acrylic Paints 

[Step 1] Pencil out your design on the wooden figures. Keep in mind the wood acts as the skin tone, so leave space for arms, feet, and neck.

[Step 2] Paint in large sections first; allow to dry before moving on so you don't smudge your beautiful figure.

[Step 3] Paint in all the detail. I didn't have much detail on the bride figure but the groom had several: a belt buckle, sleeves, pant legs, and of course his favorite hat. 

Our Finished Cake Toppers

Wednesday, January 2, 2013

Meet Tulle & Wrench


With the New Year we wanted to start a long time goal of creating a blog about things we love.

We love working with our hands and creating new things sometimes out of old things, sometimes out of new things, and sometimes just improve the things we have.   

Hope you join us on our new adventure. 

-Tulle & Wrench